When first stepping into game development, there are a lot of mistakes to be made. I recall my first project ever. As the project grew in size, so did the complexity of finding where I placed things. In an effort to keep you from having similar struggles, I want to provide a simple system that might help in the long run.
Game code should be well organized using a systematic approach. The intended purpose is to assist developers in making modifications or adding features at a later time. Other developers should be able to efficiently identify classes and methods that make up features in a game.
This is easier said than done. It should be planned from the start, and with a system or common practice in place, it should make this process slightly easier. The process I use is fairly common in the Unity community, but also applicable to any Object Oriented Programming project. It will help you avoid spaghetti code.
What is spaghetti code? Spaghetti code is the term given to scripts that are linked in a way that makes them dependent on one another to function. Easy ways to identify you have spaghetti code: 1) if you wish to make a change to specific portion of the game, you have to edit multiple scripts. 2) One part of your project breaks, several components break and no longer function as intended.

Organizing Folder Structure in a Unity Project
The first part is simply getting your scripts in a common place. I have seen many projects from students. Particularly in Unity, I have found that students working together do not always have the same practice.
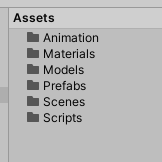
In our case, I try to encourage students to place all of their scripts into a folder in their Unity project. You can see a simple example below. Note that all assets and parts of the game go into folders. I generally do not want students to place their work in the main folder, as this quickly becomes a mess!
If you have some issues with knowing what folders to place there, you might consider using a plugin such as the Rainbow Folders 2 plugin, that can set this up for you. One of my students purchased it and has been using it on his projects recently. It does a good job of doing most of this work for you.
Organizing Classes (Scripts) in a Unity Project
Organizing classes is sometimes where students start getting confused. I believe the easiest way to think about this is to consider the English language. When Object Oriented Programming was created, making use of classes, it was really structured similar to the English language.
Classes can generally be considered “nouns”. They are people or things in your game. As an example, characters or other objects that need programming behind them would likely need a class of their own.
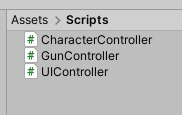
To add to this, Unity’s convention is generally to add the word “Controller” at the end. Example, “CharacterController”, “EnemyController”, “UIController”, or “GunController”. I believe the reason for this is that there are already classes in Unity that are default that may conflict.
I want to quickly reiterate that these are “things” or “objects” within your game typically. They are not actions. As an example, you would not generally have a “JumpingController”.
Organizing Code in a Unity Project
Let’s dive a bit into the code itself. If we have classes that are generally defining the objects, how do we go about creating the actions associated with it? This is where methods come into play. If classes are nouns, then methods in the classes would be verbs.
So let us go back to the CharacterController example. When structuring my class, I would create methods that represent the actions a character can perform in my game. These methods might be things like jump, crouch, run, etc.
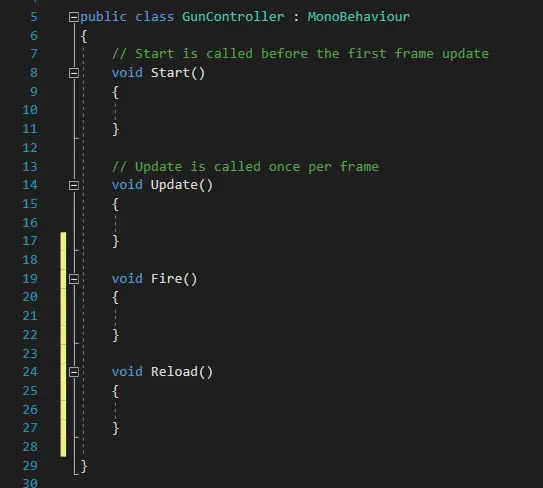
As another example, just for clarity, if I have a GunController script (or class), the actions it could likely perform in most games would be, fire and reload.
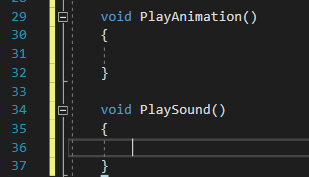
In addition to some of these, it is generally a good practice to give some additional ones that might be repetitive. As an example, in the GunController, you may have a “playanimation” method. This method would allow you to pass any animations to the gun. As an example, you would need to play an animation for reload, an animation during fire, and perhaps even an idle animation if the player is standing still. Since this is happening multiple times, it may be good to create a method to handle this for you. The same could be said for methods such as “playsound”, which may occur when reloading, firing, etc.
The idea here is that you are creating smaller pieces of code that can be easily found later on. If another developer jumps on board, if you have organized your code or put a little thought into naming convention and structure to begin with, it will be much easier later on. You certainly want to avoid placing all of your code in one large piece. It will be extremely difficult to decipher later on, or debug if something goes wrong. This is still the case, even when using comments.
Working with More Than One Unity Programmer
One of the greatest challenges for new developers is working in an environment with another programmer. Using the above method mentioned, it makes the process much easier, but you still have to be careful not to overwrite one another’s work.
The first obstacle to overcome is on how to pass work back and forth. This is particularly the case if you are working remotely. One of the most popular methods is to use GitHub.
GitHub is a great option for smaller projects. I have found there to be some issues if you are attempting to share anything outside of code. As an example, there was one project where we were attempting to use it for passing back and forth image files and 3D models. The filesize limit is quite low on GitHub. It’s not really designed for large ascii files. However, if you are strictly passing code back and forth, it can be setup in a way to not share the other files in other folders and should be fine.
This video is a bit older, but still quite relevant for GitHub.
The other option we have been using recently in the class is Perforce. This has been a great option. It is a bit daunting to get setup and get used to it, but it has been great for our class. We use it to pass all files, including 3D models, textures, and other image files from computer to computer. This is a good option, but does cost money and requires access to a server to host (AWS could potentially work).
Conclusion
Even if you do not fully understand the method that I use, I would highly recommend that you find something that works for you. If you start with it, stick with it all the way through. A naming convention and some form of pattern will allow others to learn how you work, and then can make reasonable guesses where to go if they are working with you.